Buy Me a Coffee

Sunday, April 7, 2019

Week of Chaos


A. Principles of Chaos
Chaos Engineering is the discipline of experimenting on a distributed system in order to build confidence in the system’s capability to withstand turbulent conditions in production.
Chaos Engineering is a method of experimentation on infrastructure that brings systemic weaknesses to light. This empirical process of verification leads to more resilient systems  and builds confidence in the operational behavior of those systems.
B. What is a Chaos week?
A Chaos Week is a dedicated team week focused on using chaos engineering to reveal weaknesses in our systems. We’ve all heard of hack days and hack weeks, where you focus on building new features. Well, a Chaos week is focused on building more resilient systems by breaking things on purpose.

C. References

D. Chaos Week Goals and Approach
1. Check data integrity issues to make sure that our customer data is safe.
2. Testing reflect real-world risks and impact:
  • Separate attackers from support team for realistic simulation of MTTD/MTTR (real-world surprise).
  • Test scenarios to reflect chronic real-world problems encountered in Autodesk environment
  • Testing and tools capture enough detail to measure MTTR and MTTD (if needed - engage facilitator until sufficient automated measurement removes need)
  • System under test to have load running against it (load or smoke tests)
  • System under test has same tools instrumented as production
3. Testing identifies helpful and missing resources necessary for 99.9 % MTTR/MTTD to satisfy SLA (monitoring / metrics / logging / escalation / incident):
  • Support team shares specific tools used (monitoring / logging / runbooks/...) for scenarios, efficacy of tool, and identifies gaps (during or postmortem)
  • Support team identifies critical Single Points of Failure (SPOF) for scenarios (people, systems, ...)
  • Ensure scale capacity of 10x with no customer impact
4. Testing embraces org principles: customer focus, automation, quality, security, transparency, blameless postmortem, continuous improvement:
  • Automation: Leverage existing available frameworks for Chaos and Load testing
  • Transparency: No issues to be hidden
  • Continuous Improvement: gather and synthesize data to enable trending for future test runs
  • Customer Focus: Prioritize testing and remediation based on reduction of MTTD/MTTR.
  • Coordinate testing to mitigate impact to other teams and ensure Chaos testing will not impact real customers
  • Security: Do not compromise on security.

E. Some test scenarios example for Chaos Week
  1. RDS Datais deleted \ RDS has been deleted (Full recovery from snapshot needed)
Here is an example of running it using Terraform 
  1. AZ in unavailable
  2. S3 File or folder has been deleted
  3. S3 bucket has been deleted
  4. Kill containers/instances
1.    Kill one service instance - watch for automatic restart - record results
2.    Kill instances in one AZ/region - watch for automatic restart - record results
3.    Kill all instances - watch for automatic restart -record results
  1. Stop instances/processes
1.    Stop process on one instance - watch for health check failure and self-resolution - record results
2.    Stop process on all instances - watch for health check failures and self-resolution - record results
  1. Database failover
1.    Failover Aurora writer - watch and record results
2.    Failover Aurora reader - watch and record results
3.    Failover RDS - watch and record results
  1. Redis/Elasticache failover
1.    Kill one slave - watch and record results
2.    Kill all slaves - watch and record results
3.    Stop all slaves - watch and record results
4.    Kill master - watch and record results
  1. Simulate 429's error response from an external depended service (error rate < 100% )
  2. Simulate timeout / inaccessible response from an external depended service (error rate = 100% )


You are more then welcome to suggest more test scenarios and comment below


Thursday, December 14, 2017

How to mine Ethereum in 5 min


How to start your AWS Mining instance

  1. Go to your EC2 console in AWS and change the zone to US East (N.Virginia). 
  2. This zone happens to be the cheapest for the type of instance we’ll be using, 
  3. and also contains a community AMI that has all the required mining libraries already
  4. installed for instant use.
  5. Under Instances, select Spot Instances and click ‘Request Spot Instances’.
  6. Search for a community AMI called ami-cb384fdd and select it.
  7. Under Instance type choose g2.8xlarge.
  8. Review and Launch!

How to start mining

To start mining, you’ll need an Ethereum wallet and to join a mining pool.
To generate a wallet, simply go to https://www.myetherwallet.com and follow the steps. By the end of the process, you’ll receieve a wallet address.
We’ll be using Dwarfpool for mining, which is rated in the top best mining pools. Feel free to use others if you like.
Simply SSH to your instance and type:
> tmux
> ethminer -G -F http://eth-eu.dwarfpool.com/{WALLET ADDRESS}/{YOUR_EMAIL ADDRESS} --cl-local-work 256 --cl-global-work 16384
Tmux allows you to keep a process running after closing your SSH connection.
Ethminer is an Ethereum GPU mining worker. Entering your email address allows you to receive notifications on payouts. The other parameters are for mining optimizations.
That’s it!


Source: https://hackernoon.com/how-to-mine-ethereum-in-5-min-3f3bc80d0c4b

Tuesday, October 17, 2017

How To Install Jenkins on Ubuntu 16.04

Introduction

Jenkins is an open source automation server intended to automate repetitive technical tasks involved in the continuous integration and delivery of software. Jenkins is Java-based and can be installed from Ubuntu packages or by downloading and running its Web application ARchive (WAR) file — a collection of files that make up a complete web application which is intended to be run on a server.
In this tutorial we will install Jenkins by adding its Debian package repository, then using that repository to install the package using apt-get.

Prerequisites

To follow this tutorial, you will need:
One Ubuntu 16.04 server configured with a non-root sudo user and a firewall by following the Ubuntu 16.04 initial server setup guide. We recommend starting with at least 1 GB of RAM. See Choosing the Right Hardware for Masters for guidance in planning the capacity of a production Jenkins installation.
When the server is set up, you're ready to follow along.

Step 1 — Installing Jenkins

The version of Jenkins included with the default Ubuntu packages is often behind the latest available version from the project itself. In order to take advantage of the latest fixes and features, we'll use the project-maintained packages to install Jenkins.
First, we'll add the repository key to the system.
  • wget -q -O - https://pkg.jenkins.io/debian/jenkins-ci.org.key | sudo apt-key add -
When the key is added, the system will return OK. Next, we'll append the Debian package repository address to the server's sources.list:
  • echo deb http://pkg.jenkins.io/debian-stable binary/ | sudo tee /etc/apt/sources.list.d/jenkins.list
When both of these are in place, we'll run update so that apt-get will use the new repository:
  • sudo apt-get update
Finally, we'll install Jenkins and its dependencies, including Java:
  • sudo apt-get install jenkins
Now that Jenkins and its dependencies are in place, we'll start the Jenkins server.

Step 2 — Starting Jenkins

Using systemctl we'll start Jenkins:
sudo systemctl start jenkins
Since systemctl doesn't display output, we'll use its status command to verify that it started successfully:
  • sudo systemctl status jenkins
If everything went well, the beginning of the output should show that the service is active and configured to start at boot:
Output
● jenkins.service - LSB: Start Jenkins at boot time Loaded: loaded (/etc/init.d/jenkins; bad; vendor preset: enabled) Active:active (exited) since Thu 2017-04-20 16:51:13 UTC; 2min 7s ago Docs: man:systemd-sysv-generator(8)
Now that Jenkins is running, we'll adjust our firewall rules so that we can reach Jenkins from a web browser to complete the initial set up.

Step 3 — Opening the Firewall

By default, Jenkins runs on port 8080, so we'll open that port using ufw:
  • sudo ufw allow 8080
We can see the new rules by checking UFW's status.
  • sudo ufw status
We should see that traffic is allowed to port 8080 from anywhere:
Output
Status: active To Action From -- ------ ---- OpenSSH ALLOW Anywhere 8080 ALLOW Anywhere OpenSSH (v6) ALLOW Anywhere (v6) 8080 (v6) ALLOW Anywhere (v6)
Now that Jenkins is installed and the firewall allows us to access it, we can complete the initial setup.

Step 3 — Setting up Jenkins

To set up our installation, we'll visit Jenkins on its default port, 8080, using the server domain name or IP address: http://ip_address_or_domain_name:8080
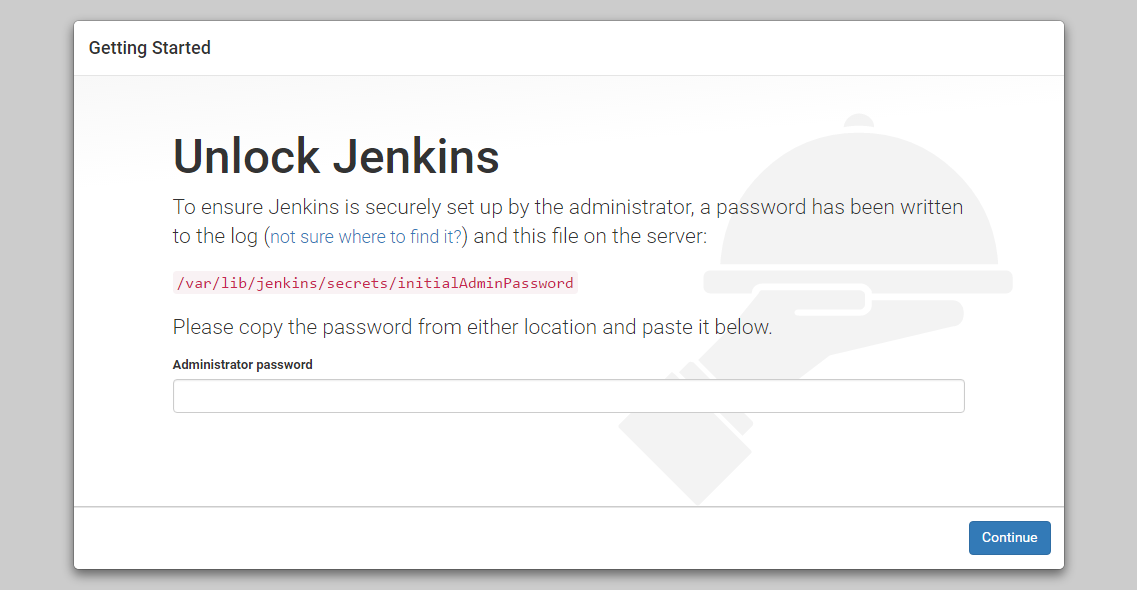
We should see "Unlock Jenkins" screen, which displays the location of the initial password
Unlock Jenkins screen
In the terminal window, we'll use the catcommand to display the password:
  • sudo cat /var/lib/jenkins/secrets/initialAdminPassword
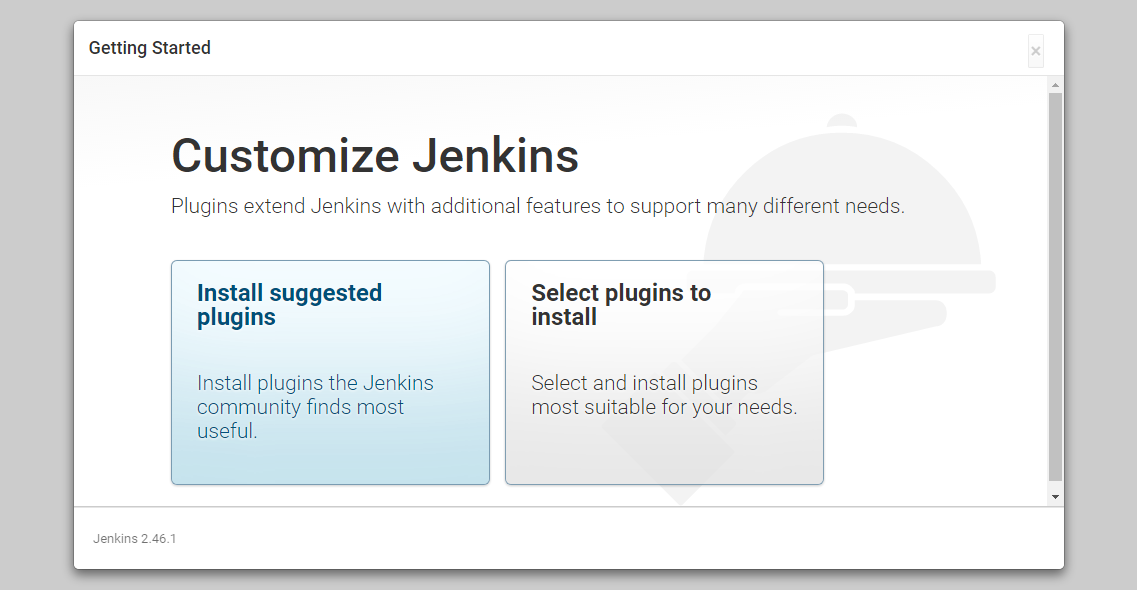
We'll copy the 32-character alphanumeric password from the terminal and paste it into the "Administrator password" field, then click "Continue". The next screen presents the option of installing suggested plugins or selecting specific plugins.
Customize Jenkins Screen
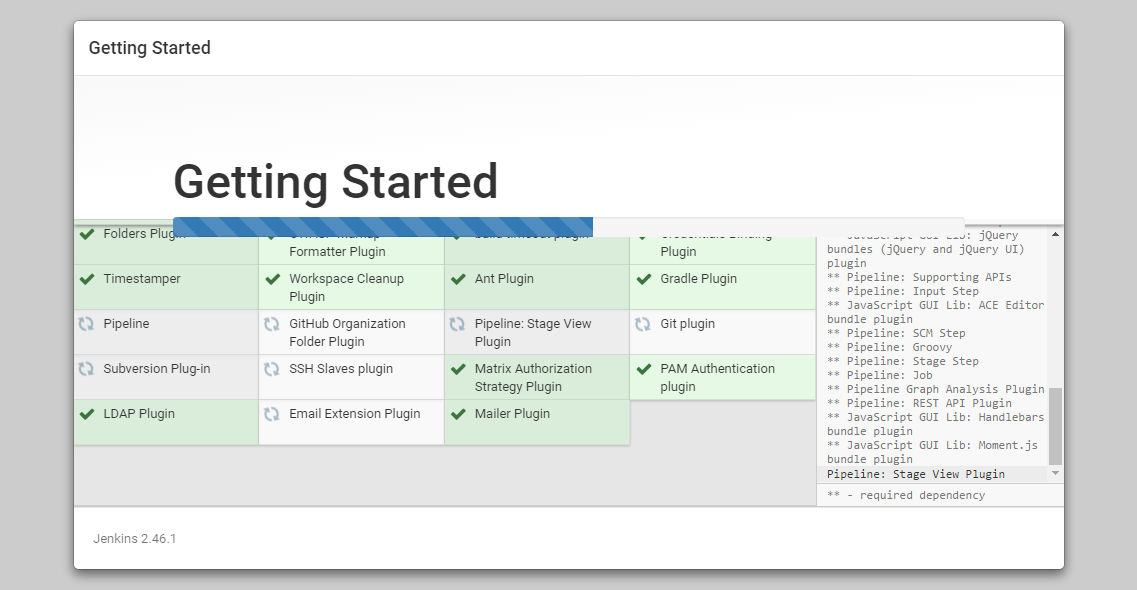
We'll click the "Install suggested plugins" option, which will immediately begin the installation process:
Jenkins Getting Started Install Plugins Screen
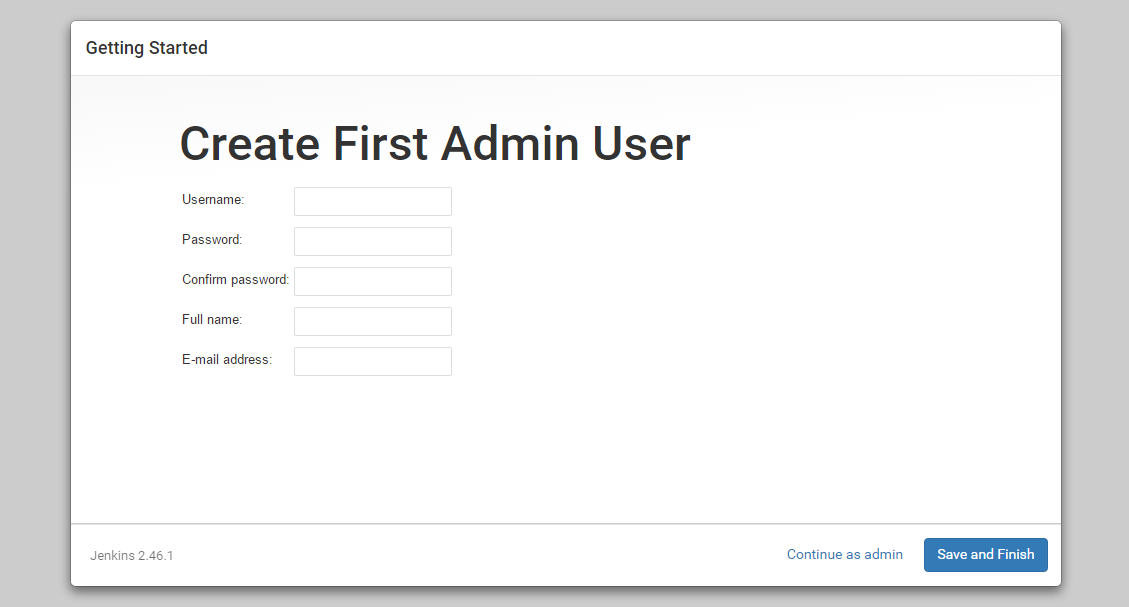
When the installation is complete, we'll be prompted to set up the first administrative user. It's possible to skip this step and continue as admin using the initial password we used above, but we'll take a moment to create the user.
Note: The default Jenkins server is NOT encrypted, so the data submitted with this form is not protected. When you're ready to use this installation, follow the guide How to Configure Jenkins with SSL using an Nginx Reverse Proxy. This will protect user credentials and information about builds that are transmitted via the Web interface.
Jenkins Create First Admin User Screen
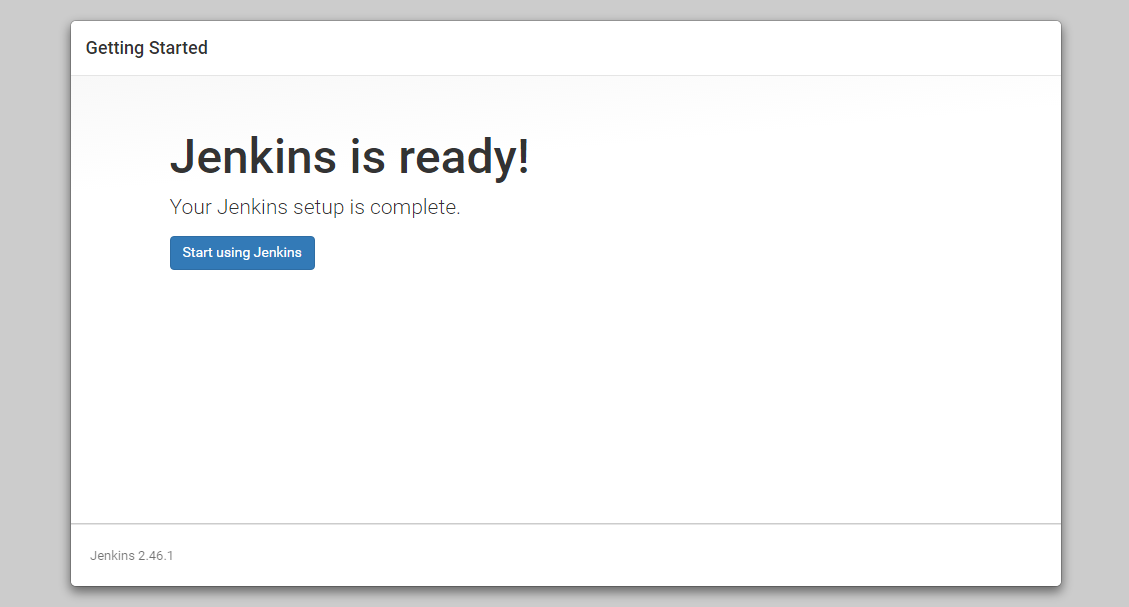
Once the first admin user is in place, you should see a "Jenkins is ready!" confirmation screen.
Jenkins is ready screen
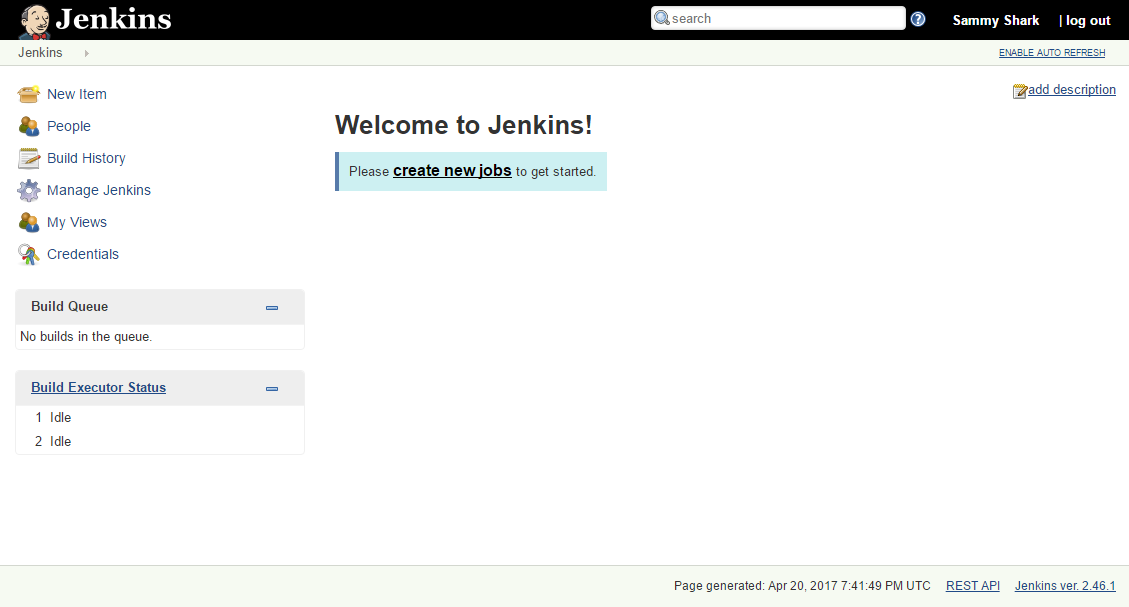
Click "Start using Jenkins" to visit the main Jenkins dashboard:
Welcome to Jenkins Screen
At this point, Jenkins has been successfully installed.

Conclusion

In this tutorial, we've installed Jenkins using the project-provided packages, started the server, opened the firewall, and created an administrative user. At this point, you can start exploring Jenkins.
When you've completed your exploration, if you decide to continue using Jenkins, follow the guide, How to Configure Jenkins with SSL using an Nginx Reverse Proxy in order to protect passwords, as well as any sensitive system or product information that will be sent between your machine and the server in plain text.


Source : https://www.digitalocean.com/community/tutorials/how-to-install-jenkins-on-ubuntu-16-04

Monday, October 9, 2017

delete AWS snapshots older than 30 days


#!/bin/sh
source /etc/profile
TODAYINSEC=$(gdate  +%s)
DATTOCOMPARE=$(date -v-30d +%s)
date > SNAP_TO_KEEP.txt
date > SNAP_TO_DELETE.txt

echo "Collecting snapshot information"

while read az; do
  echo "this is az "$az
                while read owner; do
               echo "this is owner "$owner
            aws ec2 describe-snapshots --region $az --owner-ids $owner --output json > listofsnaps.txt
            cat listofsnaps.txt | egrep "StartTime|SnapshotId" | awk -F'"' '{print $4}'  | awk 'NR%2{printf "%s, ",$0;next;}1' > listofsnaps.txt_tmp
            echo "listofsnaps for " $az "and owner" $owner "is ready"
                            while read snap
                            do
                            echo "working on snap " $snap
                            raw_date=`echo $snap | cut -d, -f1`
                            snap_date=`gdate -d $raw_date +%s`
                            echo "Snap date is: " $snap_date
                            echo "Snap to compare is: " $DATTOCOMPARE
                                      if [ $DATTOCOMPARE -gt $snap_date ]
                                      then
                                         echo $snap | cut -d, -f2 >> SNAP_TO_DELETE.txt
                                         snapToDelete=`echo $snap | cut -d, -f2`
                                         echo "Deleting Snapshot: " $snapToDelete
                                         #aws ec2 delete-snapshot --region $az --snapshot-id $snapToDelete
                                         echo "aws ec2 delete-snapshot --region" $az "--snapshot-id" $snapToDelete
                                      else
                                         echo $snap | cut -d, -f2 >> SNAP_TO_KEEP.txt
                                      fi
                            done < listofsnaps.txt_tmp
              done <owner-list.txt
done <az-list.txt

Thursday, May 11, 2017

How to get all your AWS snapshots using one command and AWS CLI


In case there is a need to view all the available snapshots from all of your account, for all of the availability zone using one command, this is how to do it.

create the owner-list.txt file which contain all of your AWS accounts number, each account should be in a line, for example

# cat owner-list.txt
483426017123 
487214417321


then create az-list.txt file, with the following availability zones

# cat az-list.txt
us-east-1 
us-east-2 
us-west-1 
us-west-2 
ca-central-1 
eu-west-1
eu-central-1
eu-west-2 
ap-southeast-1 
ap-southeast-2 
ap-northeast-2 
ap-northeast-1 
ap-south-1 
sa-east-1


now create the script itself


#cat get-snapshot.sh
while read az; do  
echo $az 
while read owner; do 
echo $owner 
aws ec2 describe-snapshots --region $az --owner-ids $owner --output json > $owner.$az.json 
done <owner-list.txt 
done <az-list.txt


the output will be list of json files, for each AZ and account.


Sunday, November 27, 2016

MSSQL (SQL) on Ubuntu Linux - The easy way


Hi

follow the next steps to install MSSQL (SQL) on Ubuntu 16.04 LTS Linux machine.

NOTE: please make sure that the machine which you are about to install MSSQL server on it have got at least 4GB of RAM, otherwise installation will fail.


1. Import the public repository GPG keys:

# wget https://packages.microsoft.com/keys/microsoft.asc --no-check-certificate
apt-key add microsoft.asc

2. Add the Microsoft SQL Server to Ubuntu repository:

echo "deb [arch=amd64] http://packages.microsoft.com/ubuntu/16.04/mssql-server xenial main" > /etc/apt/sources.list.d/mssql-server.list

3. update the source repository and install MSSQL

#sudo apt-get update
#sudo apt-get install -y mssql-server

4. After the package installation finishes, run the configuration script:

# sudo /opt/mssql/bin/sqlservr-setup


5. Type "YES" to accept the license terms.

6. Enter a password for the system administrator (SA) account, then confirm the password for the system administrator (SA) account.
 Make sure to specify a strong password for the SA account (Minimum length 8 characters, including uppercase and lowercase letters, base 10 digits and/or non-alphanumeric symbols).


7. After setup completed successfully, start the MSSQL service:

#systemctl start mssql-server

8. You may check the service status by typing: 

#systemctl status mssql-server


now that the service is up and running, you may connect to the database and manage it using SQL Server Management Studio using the SA username \ password.


here it is, a MSSQL server running on Linux machine !